|
|
|
Complete User Guide Instructions for configuring and using AccessorySmart™ |

Detailed AccessorySmart™ Features
Overview
Thank you for purchasing AccessorySmart™... your integrated aftermarket parts, garments, and accessories lookup tool. Our application will provide you with a one-stop resource for looking up products, fitment information, and availability from all leading suppliers in one convenient place, providing you with up to 80% time savings in looking up products. Best of all, AccessorySmart™ offers smartphone and tablet capabilities compatible with all current devices with no install required! We're excited to be your partner in this opportunity!
AccessorySmart™ helps dealers sell more stuff by giving parts counter personnel a one-stop resource for looking up products, cost, and availability from all suppliers in one place - saving up to $20,000 in labor costs yearly. AccessorySmart™ dramatically lowers labor cost in the parts and accessory departments of a dealership by eliminating the need to search print catalogs. AccessorySmart™ helps dealers save time and work more efficiently by looking up items across all distributors instantly, while additionally being able to review inventory levels and cost both in-store and at each distributor in one integrated application. This integrated workflow helps eliminate wasted time looking up aftermarket products and availability by 80%! AccessorySmart™ includes vehicle fitment, product SKUs, description, specifications, images, and attribute information in an easy to use online interface. Dealers can build, save, print, email, and even export customer picklists intuitively and conveniently in the application.
Traditionally all aftermarket product searches require a labor intensive process of looking up parts manually across numerous print catalogs and additional online searches for availability. AccessorySmart™ was developed to reduce the effort required to research these products, leveraging ARI's extensive products database and data conversion capabilities.
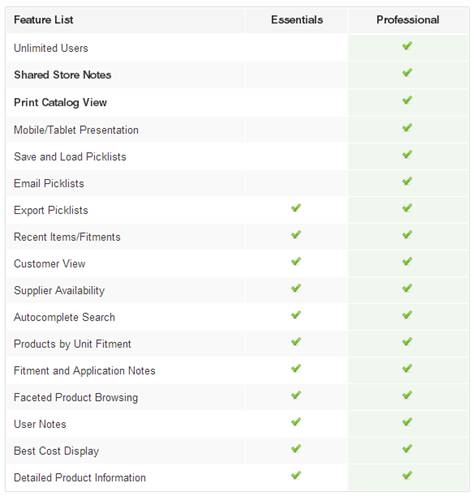
AccessorySmart™ facilitates the identification of parts via a quick search, unit fitment search, category navigation, or distributor navigation. Desired parts can be easily added and managed via a convenient picklist within the application. Picklists can be saved, emailed, printed, or exported to a business management system to simplify the order process. ARI offers two editions of AccessorySmart™ - Professional and Essentials.
• AccessorySmart Professional™ provides the most robust lookup experience, including the ability to view original print catalog PDFs electronically, a dedicated mobile/tablet experience, and extended picklist management functionality including the ability to save and email picklists. This package comes with unlimited users and includes the major aftermarket distributors.
• AccessorySmart Essentials™ includes the key features a dealership needs to develop a more efficient PG&A lookup experience - without all the extras other higher priced solutions carry. Additional catalogs desired beyond the one included in the base package may be purchased a la carte. This easy-to-use edition of AccessorySmart™ allows dealers to start with the essentials.
If you need assistance, we're here to help! If you need help with your application, you may get in touch with our technical support team as noted below. If you desire to remove any functionality from your application or would like to learn about other ARI products, you may contact our sales team as noted below.
Technical Support
- Phone: (866) 880-1615
- Email: TechSupport@arinet.com
Sales
- Phone: (800) 755-6040
- Email: AccessorySmart@arinet.com
Accessing AccessorySmart™
Accessing AccessorySmart™ is very simple. AccessorySmart™ is built entirely as a web application, accessible from any location with internet connectivity and a web browser. No software install is required to begin using the application. The application utilizes the latest web technologies to deliver a rich user experience. To ensure the best experience using the application, we recommend reviewing the application compatibility specifications below and tailoring your technical environment accordingly.
Internet Connectivity
• Broadband (DSL or Cable)
• Mobile Broadband (3G or 4G/LTE)
Browser Compatibility
• Google Chrome 20.0 and up (Recommended)
o Click for free Google Chrome Download
• Mozilla Firefox 15.0 and up
o Click for free Mozilla Firefox Download
• Apple Safari 5.0 and up
• Internet Explorer 8.0 and up
• Apple Safari Mobile (iPhone/iPad)
• Google Chrome Mobile (Android 4.0, Ice Cream Sandwich and up)
During the signup process you selected an email address and password for accessing the application. Your application is available for use immediately after completing signup via the online login. If you have misplaced your chosen login credentials, you may reference the sign up confirmation email we sent to your email address which includes your email login.
You may access and login to the application immediately via the web address below. We recommend using Google Chome, Mozilla Firefox, or Apple Safari for the best experience as outlined in the technical overview above.
We recommend bookmarking the address below in your preferred web browser for convenient future access.
Configuring AccessorySmart™
After signup, AccessorySmart™ is automatically configured with the catalogs you selected. You may begin using the application with no further configuration required.
You may further tailor your application by adding users, catalogs, and features in the administration area of the application. This section outlines updating these areas via the administration area.
Adding Users
If you have multiple staff personnel that you wish to provide with access to the application, you may add additional users to your application via the settings area. A given user account may only be logged into the application at a time, so if there are multiple store personnel that will be using the application concurrently we advise setting up additional user logins for each employee.
AccessorySmart Professional includes unlimited users at no incremental monthly cost. Additional users are available in AccessorySmart Essentials at a monthly incremental cost of $10 per user per month. Your billing will be automatically adjusted to reflect any user additions.
Additional user logins can be easily added automatically to your application via the settings link located in the upper-right area when logged into the application with your original administrator login. The default administrator login is the user you created at signup.
To add users, follow the steps below:
• Log into AccessorySmart™ with your administrator account (http://accessorysmart.arinet.com).
• Click Settings to access the administration panel.
• Select Users.
• Click Add User.
• Complete the new user form with the required user information.
• Select the desired user role.
• Administrator - provides a user with full access to the application and the Settings application administration area.
• User - provides a user with access to the application only; the Settings application administration area will not be accessible.
• Limited User – provides a user with access to the application only. In addition, Limited Users are not able to access or view Cost information.
• Click Save to save the users you added.
Updating Users
Administrators can update or change user accounts and login credentials using the Settings application administration area.. You may use this area to change passwords or reassign logins to other store personnel.
To edit a user, click Edit link next to the desired account on the Users page of the administration area. You may enter a new email and/or password to update the account.
Important Note: If you change the login email or password of your account, AccessorySmart™ automatically logs you out upon saving. You will need to log in using the new credentials to continue using the application.
Removing Users
Since removing users may require an adjustment in your monthly billing, you must contact your sales representative to remove users from your application. You may contact sales at 866-479-2693.
Adding Catalogs
Use the Settings section to easily add additional catalogs.
AccessorySmart Professional includes three catalogs at no incremental monthly cost. AccessorySmart Essentials comes with one included catalog; any desired additional catalogs are available at a monthly incremental cost. Your billing will be automatically adjusted to reflect any catalog additions.
To add catalogs, follow the steps below:
• Log into AccessorySmart™ with your administrator account.
• Click Settings to access the administration panel.
• Select Catalogs to display the list of available catalogs. link from the menu on the left
• Click the checkbox next to the desired catalog. Note: Parts Unlimited requires authorization to add the catalog. Please supply your Parts Unlimited dealer number in the field provided.
• Click Save to enable the catalog.
Removing Catalogs
Since removing catalogs may require an adjustment in your monthly billing, you must contact your sales representative to remove catalogs from your application. You may contact sales at 866-479-2693.
Navigating AccessorySmart™
The navigation in AccessorySmart™ is very easy to use. It is based on two paradigms: searching and browsing. This section briefly explains each of the available navigation methods available in the application.
Searching
With AccessorySmart™, searching is easy and you can drill down to find what you need quickly. You must first select the activity tab for the products you wish to find, such as Street, ATV, and so on.
Once you select an activity, you can find information multiple ways:
• Quick Search - use the quick search to key in anything you're looking for. The quick search includes a suggestions panel which displays immediate relevant results that can be viewed directly when clicked. You may search on a wide variety of things including categories, brands, vehicle fitments, part numbers, and more!
• Fitment - use the fitment search panel to select a desired vehicle for which you would like to view all available compatible parts. Save the vehicle selection to immediately view all compatible parts.
Browsing
In addition to directed searches, you may also simply browse all available products by logical groupings.
Once you select an activity, you can find information multiple ways:
• Category Browsing - click on any of the categories on the left side of the page to immediately view all products that are available within the category.
• Distributor Browsing - click the distributor tab and select a distributor to view all available products for that distributor.
• Brand Browsing - click the brand tab, click the first letter for the brand from the index and select a brand to view all available products available from that brand.
Using Picklists
AccessorySmart™ includes a robust integrated Picklist function, which supports assembling, managing, and storing customer purchase orders directly within the application. This function enables you to quickly find and manage all desired parts without having to write down part numbers or jump to another application.
Any items desired to be selected within the application are added to the active picklist, after which you can easily choose to take a number of actions on the finished part list. The picklist is always available in the application, presented as the final tab in the activity navigation tabs at the top of every page.
Once you have compiled a desired list of products, you may do the following with a picklist:
• Save for future retrieval
• Print a hard copy for customer or internal usage
• Email to customer or internal employees
• Export to Business Management System for purchase order or customer order creation
You may manage and create multiple picklists using the save, close, and load functions within AccessorySmart™, helping to provide you with an easy way to manage parts found within a session. For a more detailed summary of the Picklist features available in the application, please review the Picklist overview in the Detailed AccessorySmart™ Features section in this document.
Detailed AccessorySmart™ Features
AccessorySmart™ is organized in a manner consistent with many online product search tools, so it is very quick and intuitive to use. This section will provide a brief overview of the key application functions and capabilities.
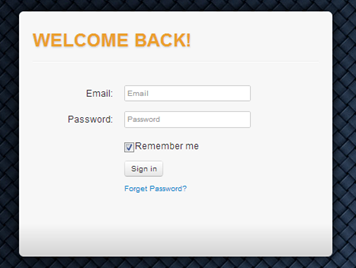
Login Screen
The login screen is located at http://accessorysmart.arinet.com, which is accessible from any computer with a web connection via web browser.
Users can log into the application using their account email and password as set at signup or via the administration panel. This panel also contains a link to enable users to reset their password in the event that it is forgotten.
Password Reset
If a user forgets their password, they can click the "forget password" link to be directed to a screen to enter their email address. Users will receive an email that contains a link where they can enter a new password for their login.
Activity Landing Pages
The following section outlines the Activity Landing pages and features
available on this screen. Each area includes a reference to the diagram
located at the end of this section.
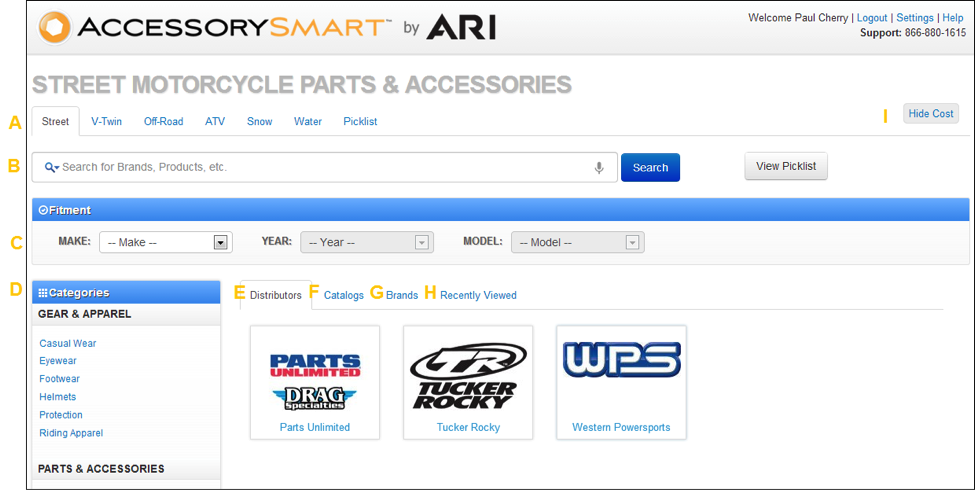
Activity Selection and Picklist
AccessorySmart™ organizes all products, catalogs, and fitments by associated activities Activities are grouped under Street, V-Twin, Off-Road, ATV, Snow, and Water. You may begin a part or fitment lookup by selecting the proper activity of the product. Items that cross over multiple activities, such as apparel, will appear in multiple search results.
Once you select an activity, you may refine your search by keyword or fitment or by browsing by category, catalog, or brand.
A convenient link to your current picklist is also available in the top navigation tabs. Clicking the Picklist Tab will take you to your current picklist.
Quick Search
The Quick Search form allows you to search for products by keyword (B). The search includes an autocomplete feature so that when you begin to type a word, a list of results display in a drop-down. You can select an item from the drop-down list or click Search to display all results associated with your keyword.
The Quick Search panel supports searches on:
• Product Name ("Mesh Jacket")
• Manufacturer or Distributor SKU ("0103-0667")
• Vehicle ("2010 Yamaha R1")
• Brand ("EBC")
• Category ("Helmets")
Tip: The autocomplete often yields the quickest results when searching for a brand, category, and fitment. We recommend using it aggressively!
Fitment Search
The fitment search enables you to enter a vehicle fitment and immediately view all parts that fit that specific unit (C). You may enter a desired fitment using the provided drop down menus and clicking save to view all parts that fit the desired unit. Note that fitments are associated with the selected activity - if you're looking for an ATV fitment, you must select the ATV activity tab to find and select the desired vehicle.
Tip: Only parts with a specific fitment will be returned when using the fitment search. If you are searching for parts with universal fitment like tires or grips, we recommend searching for those products by category.
Category Browsing
The category browsing panel enables you to browse for products using standardized product categories (D). Categories are organized under either Gear & Apparel or Parts & Accessories. Simply click on a desired category to begin browsing for products belonging to that category across all supplier catalogs you have enabled in the application.
Distributor Browsing
The distributor browsing tab enables you to browse for products contained within a specific supplier by the active activity (E). Simply click on the distributor you wish to browse to view all products within that supplier.
Tip: Items shown when a distributor is selected are filtered by the proper Activity landing page, so if you are looking for an ATV, select the ATV activity tab to view available ATV items within the selected distributor.
Brand Browsing
The brand browsing tab enables you to browse for products by brand (G). Click on the brand tab and click the letter corresponding with the brand to view all brands within the active activity page. Select the desired brand to browse all products available from that brand.
Tip: Items shown when a brand is selected are filtered by the proper Activity landing page, so if you are looking for an ATV product, select the ATV Activity tab to view available ATV items within the selected brand.
Recently Viewed
The Recently Viewed tab enables you to quickly find recently viewed products and vehicle fitments (H). Click on any of the recent items to view the product or items for a specific fitment.
Tip: Recently Viewed items are associated with your login credentials, so you will only view items you recently looked up.
Cost Toggle
The Cost Toggle (I) allows you to hide or display Cost information across the application. The button is available on all pages.
Browsing Page
All browsing selections and searches in the application will direct you to the Browsing page. You may click on the activity tab or AccessorySmart™ logo in the banner at any time to return to the home Activity page. The browsing page enables you to quickly filter all products using filter options on the left, as well as view detailed product availability across all available suppliers at a glance.
To streamline the experience and reduce the number of clicks required to browse products, the browsing page automatically loads more matching items as you scroll down. An icon will appear in the lower-left hand corner which can be clicked to automatically jump to the top of the page as you scroll down.
Each area includes a reference to the diagram located below.

Product Filter Panel
The filter panel allows you to quickly filter available products by category, subcategory, product attributes, and price (A). Simply click the desired option to dynamically narrow all results by that selection. Multiple filters can be applied at once and filters can be easily reset using the provided link at the top.
Cost and View Toggles
The top of the results panel includes convenient toggles to hide cost and change the presentation of products (B). Clicking the Cost toggle will hide cost references on the page, allowing you to easily show the options available to a customer without also showing the cost information.
View toggle icons are also available to the right of the cost toggle, which enable you to alter the presentation layout of the products if desired. The browsing page shows in list view by default, which includes detailed cost and availability references. Clicking on the alternative grid layout toggle will update the presentation to show the products in a grid with large images, while hiding cost and availability information, offering another customer-friendly display option.
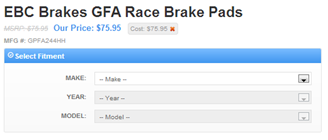
MSRP and Cost Display
In the default list view, the lowest MSRP and Cost across all suppliers is displayed on the right side of each product result (C). MSRP is shown in bold, black text with Cost shown in light grey to the right of MSRP.
Tip: To streamline and consolidate product browsing, all SKUs are grouped into distinct products. For example, all SKU variations by fitment for EBC X Series Carbon pads are organized under one product. Accordingly, MSRP and Cost may be higher or lower after selecting a specific SKU on the product detail page.
Supplier Availability Indicators
In the default list view, supplier availability indicators are available to provide availability disposition information at a glance (D). Each product shows an indicator of all suppliers that carry the product, with a color code indicating the availability of the product at the supplier.
Availability indicator color codes:
• Green: All product SKUs available at supplier
• Yellow: Partial availability of product SKUs; view product detail page for detailed availability
• Red: No product SKUs available at supplier
Fitment Indicator
In the default list view, fitment indicators are shown to identify products that have vehicle fitment available (E). The fitment panel at the top of the browsing page can be used to find items that match a specific vehicle or vehicle selection can be made on the product detail page. Items without this indicator are universal and are not associated with specific vehicles.
Product Detail Page
After selecting a desired product from the search or browsing panel you will be directed to the product detail page where you can view extended product and availability information. The product detail page includes a wealth of information including specifications, vehicle compatibility, fitment notes, supplier availability by warehouse, cost, and even print catalog page references.
Each area includes a reference to the diagram below.
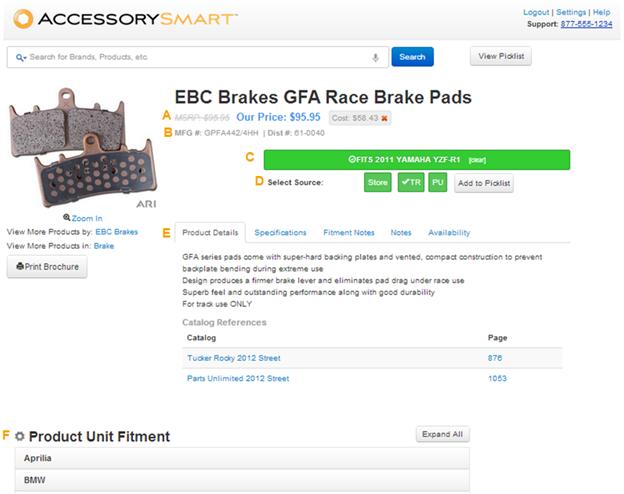
MSRP and Cost Detail
The product detail page provides MSRP and Cost for a selected SKU for each available supplier (A). Click on one of the color-coded supplier source selection buttons to view the MSRP and Cost for the selected supplier and SKU. The MSRP and Cost display dynamically update when a different SKU and supplier are selected.
Manufacturer and Distributor SKU Reference
The product detail page provides the detailed manufacturer and distributor SKUs for a selected item for reference (B). The manufacturer SKU is shown by default when an item is selected. The distributor SKU is displayed dynamically upon selecting one of the color-coded supplier source options.
Product Variant Selection
If there are multiple SKU variant of a product available for varying sizes, colors, fitments, etc, selection options will be presented to aid in selecting the desired SKU (C). Products with fitment associations will require you to select the desired unit fitment to select the SKU. Attribute-specific selection controls will be displayed for universal items with variants available based on color, size, material, etc.
Tip: If a vehicle fitment is already active from the browsing page, a vehicle compatibility confirmation message will be shown in place of the fitment selection panel.
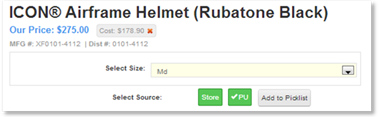 |
Supplier Source Selection
After selecting the desired product and variant, the final step required to add the item to the picklist is selecting the desired supplier source (D). Similar to the browsing page, the available suppliers that carry the selected item are displayed with availability color-coded buttons.
Click on the desired supplier to view the detailed supplier availability by warehouse location. After selecting the desired supplier source and confirming availability, you may click the "add to picklist" button to add the item to your active picklist. The desired supplier source will be captured and noted on the picklist to aid in ordering the item and fulfilling the order. If you have a business management system integrated with your application, may also view your store availability and select it as a fulfillment source.
Detailed Product Information Tabs
Detailed product information is available in a series of tabs at the bottom of the Product Detail page (E). Available information presented in tabs in this area includes a description of the products, print catalog references, fitment notes, store/user notes, and availability. Brief descriptions of each of these areas follow below.
Product Details
The product details tab provides the marketing description for the product as well as the supplier print catalog page references where the product can be found. In AccessorySmart Professional, you may click on the catalog page reference to view an electronic copy of the print catalog page for additional review and research.
Specifications
The specifications tab displays the basic specifications/attributes for the selected product.
Fitment Notes
Certain parts with a specific vehicle fitment association include fitment notes that aid in selecting the proper product for the identified vehicle. Click on the Fitment Notes tab to view extended fitment notes such as part application (front, rear, left, etc.)
Notes
The notes tab provides users with a place to enter notes about the product for future reference. User Notes can be entered and saved for future visibility to only the logged in user. Store Notes can be entered and saved to share the note across all users within the store, regardless of login.
Availability
The availability tab enables you to view the detailed availability for a supplier source selected above. Warehouse quantities are displayed for each location of the selected supplier. If a Business Management System is integrated, the in-store availability may also be viewed when clicking on the "store" source.
Product Fitment Compatibility Panel
The product fitment panel presented at the bottom of the Product Detail enables you to view all makes and models for which the given product has compatible fitment SKUs available (F). You may click to expand any brand to view the models with compatibility or click the "expand all" button to view the full list across all manufacturers.
Tip: Clicking on a unit link in the fitment panel will automatically select the SKU that fits that unit.
Picklist
The application includes an integrated picklist function which enables you to build picklists of desired parts for a customer order and take various actions on the picklist. Parts found within the application can be grouped in a picklist to conveniently build customer orders and/or purchase orders. The picklist area is shared across your store, enabling picklists to be shared and retrieved between users within your store. You may navigate away from the picklist panel at any time by clicking on a desired activity tab, clicking on the logo in the banner, or clicking the "previous page" button at the bottom of the page.
Each area includes a reference to the diagram below.
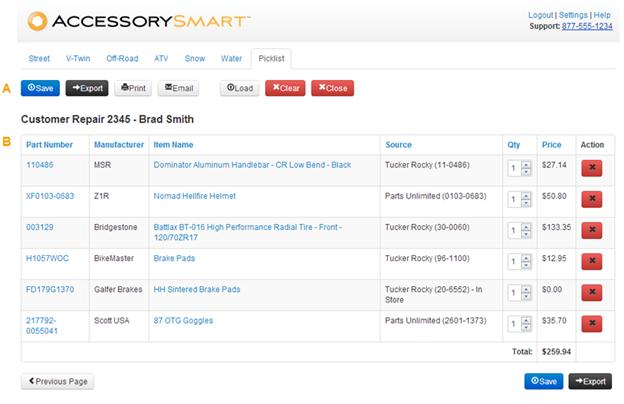
Picklist Actions
The picklist action panels allows you to take a number of actions on an active picklist, such as save, print, load, print, clear, and even export to a connected Business Management System (A). The available picklist actions are defined below.
Save Picklist
Users can save an active picklist for future retrieval by any store users. When saving a picklist, a picklist name and customer name can be entered to streamline searching and loading a picklist in the future for a customer.
Tip: The active picklist will be closed upon saving a picklist and a blank picklist will be loaded. To open a save picklist again, click on the load button and search for the desired picklist.
Export Picklist
If a Business Management System is connected to your application, you may click the export button to send the active picklist to your management system to save time and effort rekeying parts for building a customer or purchase order.
Print Picklist
Users can print an active picklist to provide a customer or employee with a hard copy of all selected parts.
Email Picklist
Users can email an active picklist to a customer or employee. When emailing a picklist, you can enter the desired email address to mail the picklist copy to, along with any desired notes to be included with the picklist. The picklist will include the active user's email to streamline customer replies and follow up emails.
Load Picklist
Previously saved picklists can easily be retrieved and loaded by clicking the Load button. After clicking load, search on either the saved picklist name or customer name to find and load the desired picklist.
Tip: Save picklists are shared at the store level, making it easy to find and retrieve picklists saved by other store users.
Clear Picklist
Active picklists can be cleared and discarded by clicking the clear picklist button. Clearing the picklist will remove all items from the active picklist.
Tip: This function is not reversible, so do not clear a picklist until you are sure you will no longer need the items in the active picklist.
Close Picklist
If you wish to close a picklist, you may click the close button. Closing saved picklists will not alter any of the items in the picklist. After closing a saved picklist, a new blank picklist will be loaded.
Tip: If you wish to retrieve an unsaved picklist in the future, be sure to save it before using the close function.
Picklist Summary
The picklist summary table displays all items that have been added to an active picklist (B). The summary includes the manufacturer part number, manufacturer, description, selected source, and controls to edit the quantity or remove items from the picklist individually. The red "x" button will remove an item from the active picklist.
Tip: The source column displays the source that was selected on the product detail page, enabling you to note which supplier you wished to fulfill from. The supplier part number is appended to the source name in the column as well, aiding in supplier reference when a supplier part number differs from the manufacturer part number.
Frequently Asked Questions
How can I access the application if I forget my password?
If you forget your password, navigate to the login screen and click "Forget Password?" You will then be able to enter your login email address and have a password reset link emailed to you. Click the link provided in the password reset email to be taken to a form where you may enter a new desired password and proceed to log into the application with your updated credentials.
How do I add an item to the picklist from the Product Detail page?
To add an item to the picklist, you must first select from any options or fitment options presented on the detail page. After selecting from the available options, you must also click on the preferred supplier source (color-coded buttons). After selecting the options and supplier you may click to add the item to an active picklist.
Why do I get a message that I am already logged in when trying to log into AccessorySmart™?
A single user may only be actively logged in and using the application at one time. This message is displayed if your user is already logged into the application on another computer or browser. An option to override the existing option is presented which will allow you to continue logging in, which will automatically log out the other user using your same login.
How do I integrate my Business Management System with AccessorySmart™?
Business System Integration is only available with CDK Lightspeed NXT and EVO at this time, though we will be expanding the integration options in the coming future. To integrate with CDK Lightspeed, contact our Sales team at (800) 755-6040.
Where does the supplier cost and inventory data come from and how often is it updated?
The supplier cost and availability data within the application is updated one time per day, via a nightly update process.
What if I have a special purchasing cost? What cost is displayed in the application?
AccessorySmart™ includes the baseline MSRP and cost information for all suppliers. The cost levels displayed in the application are the standard cost. If you have special purchasing costs due to dealership status, those cost levels will not be displayed within the application.
What Distributor information is passed to my Business Management System when I select the Store source and export a picklist?
You may select your preferred distributor in the AccessorySmart™ administration panel on the DMS settings page. When you select the store source and export items to your Business Management System, the preferred distributor you selected in the administration panel will be used.
Why do I get a message that no products are found when searching within AccessorySmart™?
The most common reason for seeing the no products found message is when a fitment remains actively applied in the application and performing a search or viewing a category with no associated fitments. To clear an active fitment and view all available items, click the Clear button in the fitment panel, located above the product results in the application. Also, ensure that you are not searching for items that fit a unit within the wrong Activity page.
How is AccessorySmart billed?
Dealers Credit Cards will automatically be charged each month.
If a dealer wishes to cancel the software how is this handled?
Contact our Sales team at (800) 755-6040.
If a dealer wants to shut off catalogs how can that be done?
Contact our Sales team at (800) 755-6040.
If a dealer wants to switch packages how can that get accomplished?
Contact our Sales team at (800) 755-6040.
If a dealer has two stores can they run them both on one AccessorySmart license?
No. The contract states that it is for one physical location. Dealers can simply purchase another instance of AccessorySmart.